Installation with lowering device
The mixer is lowered into the basin using a lowering device. The lowering device’s guide pipe safely guides the mixer to the duty point. The resultant reaction forces are transferred directly into the foundation via the lowering device. The foundation must be designed to bear this load!
Preparatory works
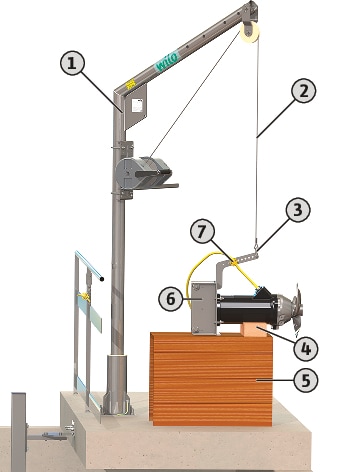
1 | Hoisting gear |
2 | Lifting equipment |
3 | Shackle for attachment |
4 | Support |
5 | Platform for secure set-down |
6 | Frame |
7 | Cable brackets for strain relief |
- Mixer set down and horizontal.
- Frame mounted on the mixer.
- Lowering device mounted in basin.
- Hoisting gear with sufficient bearing capacity provided.
- Attach lifting equipment to frame with a shackle.
- Version with plastic rollers: Loosen linchpins and dismantle plastic rollers and quick-release axles.
- Lay all connection cables and mount cable brackets.
The cable brackets fix the connection cable to the lifting equipment and prevent uncontrolled floating of the connection cable in the basin.
Mixer | Cable bracket clearance |
|---|---|
TR/TRE 20 | 550 mm (20 in) |
TR 28-1 | 550 mm (20 in) |
TR/TRE 30 | 750 mm (30 in) |
TR/TRE 40 | 750 mm (30 in) |
Lift the mixer and swivel it over the basin
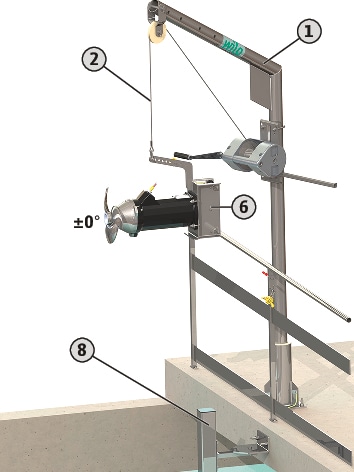
1 | Hoisting gear |
2 | Lifting equipment |
6 | Frame |
8 | Guide pipe for lowering device |
- Preparatory tasks completed.
- Lift mixer so that it can be swivelled safely over the railings.
- Swivel the mixer over the basin.
Mounting the mixer on the lowering device
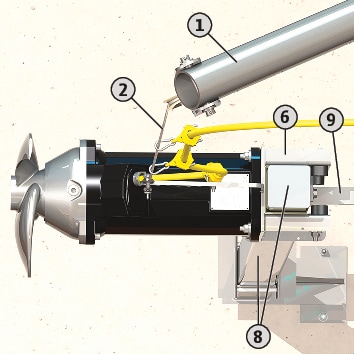
1 | Hoisting gear |
2 | Lifting equipment |
6 | Frame |
8 | Guide pipe for lowering device |
9 | Upper holder of the lowering device |
- Mixer hangs horizontally.
- Frame perpendicular to the guide pipe.
- Cable bracket is installed.
- Slowly lower the mixer.
- Insert the guide pipe in the frame without tilting.
- Version with quick-release axles:
Lower the mixer until the frame is below the upper holder. Install the quick-release axles and plastic rollers and secure them with linchpins!
Completing installation

1 | Hoisting gear |
2 | Lifting equipment |
8 | Guide pipe for lowering device |
10 | Connection cable |
11 | Cable bracket with snap hook, cable routing via lifting equipment |
12 | Cable bracket with snap hook, safeguard against falling |
13 | Fixed limit stop |
- Mixer mounted on the lowering device
- Slowly lower the mixer.
- Hang the connection cable on the lifting equipment using the cable brackets.
The connection cable is routed safely using the lifting equipment (e.g. wire rope). - Lower the mixer to the end of the guide pipe or until it reaches the fixed limit stop.
- Secure the connection cable to the railing or hoisting gear to prevent it from falling!
- Check the swivel range of the lowering device.
Check the entire swivel range of the lowering device. The mixer must not bump into any structures (fixtures, basin wall). - Set the desired angle and install a screw to secure the lowering device against further adjustments.
- Installation is complete. Lay the connection cable and make the electrical connection.
Mobile hoisting gear: Installing a cable bollard
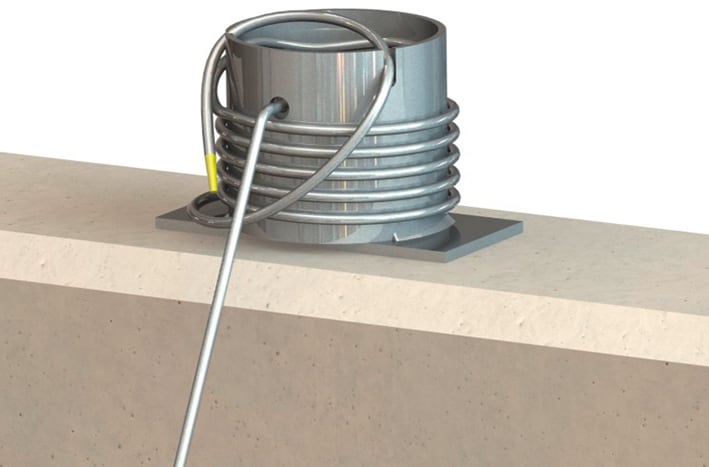
If a mobile hoisting gear is used, install a cable bollard at the edge of the basin:
- Remove lifting equipment (e.g. wire rope) from the hoisting gear and secure to the cable bollard.
- Secure the connection cable edge of the basin to prevent it from falling.